Introducing vim

So you want to learn the way of vim? What have you heard? The learning curve is high; you’ll need to type obscure commands just to quit? There is learning ahead, true, but it’s not like that at all. Frankly, you can learn to use vim in 20 minutes with a tutor you already have on your system.
Try it out:
vimtutor
In a week you’ll surpass your speed in your old editor (Disclaimer: any bashing of other editors here does not mean to include emacs. Emacs is also awesome and you should learn it too.) It’s not really difficult at all, but it foreign.
What makes vim so different? Modes.
Modes
Vim is a modal editor. When you think of modals you probably imagine pop-up menus in a web page. That’s not wrong, per se, but it misses the point. For an idea of what I mean by modes, instead think of a car. If your car is in Drive, when you push the gas you’ll find yourself going forward. If your car is in Reverse the opposite will happen. If you’re in Park, you’ll get a cool revving sound that will make you look cool to 12 year olds. These are modes. You perform an action and based on the mode of your system (in this case a car), different things happen.
User Experience professionals and Human-Computer Interaction experts have been bashing mode-based interfaces for years. They love to explain how modes are the cause of confusion and errors, and unnecessary complexity. Perhaps they’re right, or perhaps people find modal systems difficult because they’re unfamiliar. Whatever the case, you’re about to take a journey that will give you a blazing, clear example of a modal system working well.
When you first open vim, you’ll find yourself in Normal Mode. Drew Neil describes this in his fabulous book, Practical Vim, as being akin to an artist with his paint brush hovering over a canvas. When you are painting, you don’t spend the majority of your time with your brush making strokes. A good painter plans his strokes, choosing carefully where to put down his brush before making a careful and tactical mark.
Putting the brush to the page is akin to Insert Mode in vim. You get what you type, for the most part. You can enter Insert mode from Normal mode by typing the i key.
There are other modes in vim too, like Visual Mode, Visual-Block Mode, Select Mode, Command-Line Mode, and Ex Mode. For now lets just focus on Normal and Insert, though.
Movement
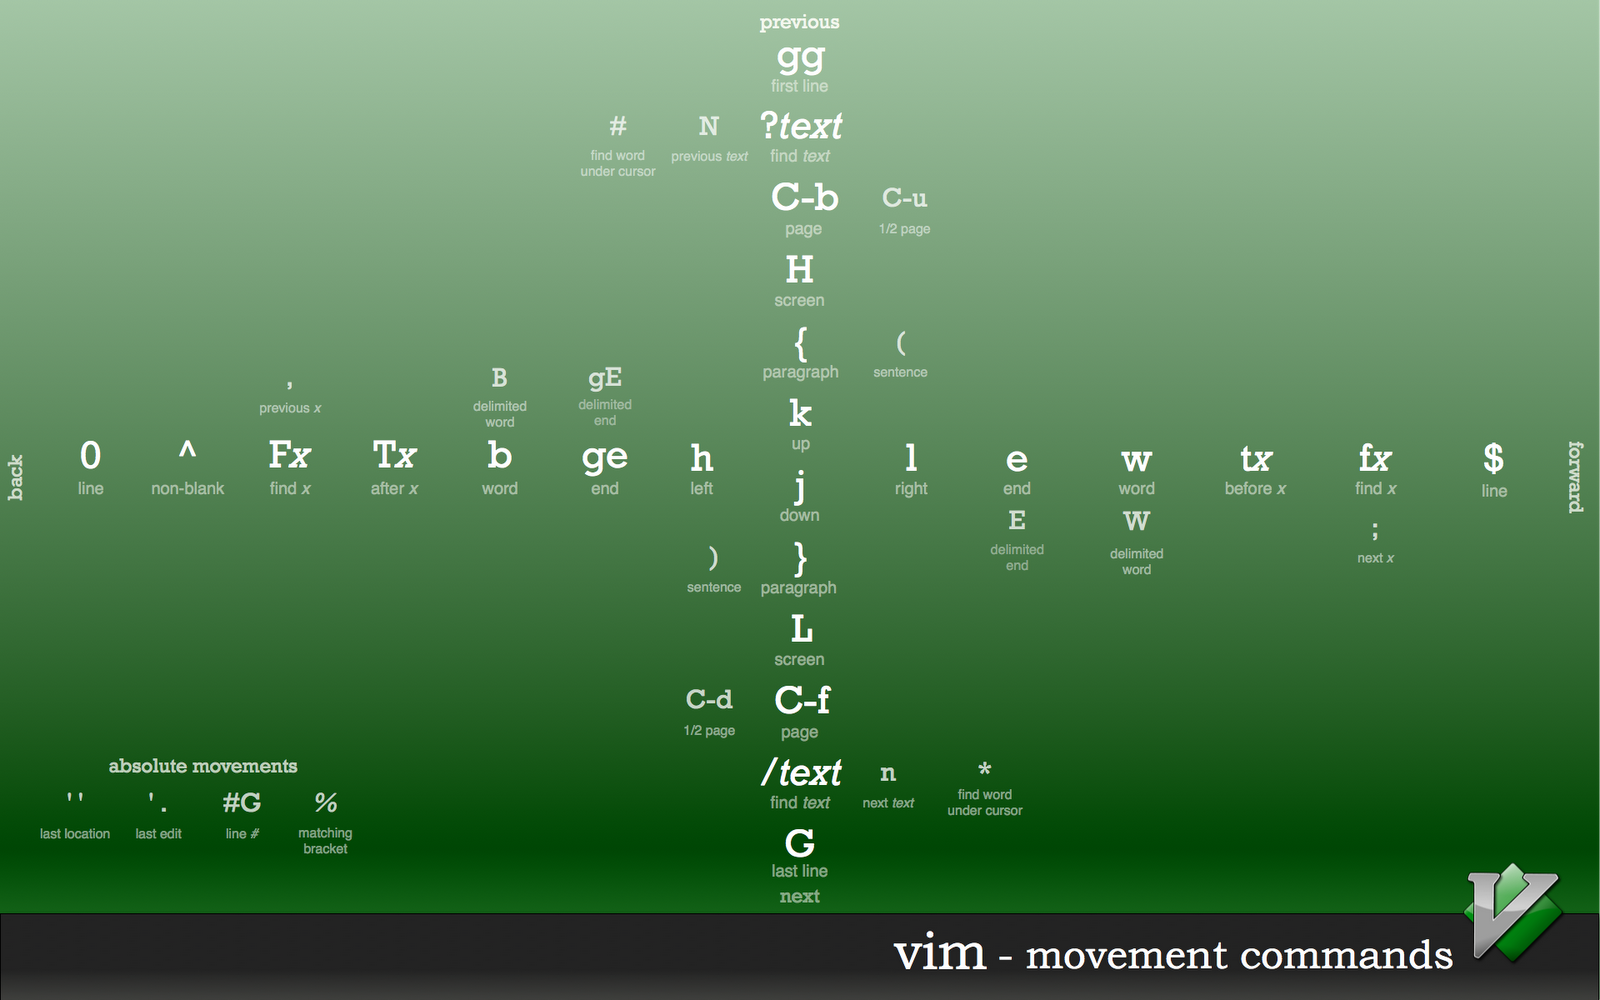
Normal mode allows you to move quickly across your document, skipping around by paragraphs, code blocks, jumping to function definitions, visually to the middle or bottom of the screen, and pretty much anywhere else you want to go in a matter of a few keystrokes. No, seriously, I’m not exaggerating here. Here’s a great diagram covering the movement keys available to you in vim without any special plugins or configuration.
Most commands in vim, whether they be actions or movement, have a mnemonic device to help you remember. A number of these are listed in the graphic above.
Verbs
So what about when you want to do something? Delete something, copy to the clipboard, replace a string? These are the verbs of vim and their mnemonics are strong as well.
d= deletec= changey= yank (like copy, but from a time before copy/paste existed)p= put (like paste)v= visual (select)
There are a few more, but in day-to-day usage, these will get 99% of your work done. Not a whole lot to memorize, is it?
If you want to delete something, press d. But wait… what are you deleting? The power of vim starts to become apparent when you realize that the d command on its own does nothing at all. In order to complete the verb, we need to tell it where to apply it.
Think of this combo as “Verb -> Movement”, and it is the introduction to composition.
Composition
All of those fancy movement keys you learned earlier aren’t just for jumping around Normal mode. They’re also part of every action you’ll take. I think this is best illustrated with an example.
If we want to delete a word we add the delete command with the movement command for a single word: d and w -> dw. If you want to yank everything to the bottom of the current paragraph, following the same pattern you would get: y}.
In vim you can see the keystrokes being entered in the lower right corner of the screen. This is related to something called Operator Pending Mode, but for our purposes it means you can get a sense of the commands I’m entering to accomplish the text manipulations seen here.
Repetition
“Verb -> Movement” is a powerful thing, and it can be made more so by understanding the benefits of this encapsulation. If a full command is considered one of these complete compositions, then we can operate on the whole piece as well.
You can enter a number prior to your verb and the entire command will be repeated that number of times. Also, you can repeat the last command, whatever that composition might have been, by pressing the . key. Finally, your undo levels are defined by your commands as well. Each time you press u it will undo the last full composition.
Summary
There’s a lot to vim. It is a tool you can keep learning for years and years and never fully master. It is also easily accessible to new learners. It has a fantastic support group (#vim on irc.freenode.net for starters), tons of tutorials, guides, books, etc. It is quick to pick up the basics. It is installed on almost every system in the world, and easily added on the few (Windows) that it’s missing from. It is an investment that will pay for itself immediately, and continue to benefit you for as long as you write.
Now, if you haven’t already, go launch vimtutor and start vimming.
Have questions about vim or want more guidance? Disqus below!
The gifs included in this post were generated with imagemagick, ttyrec, and sugyan’s version of ttygif. Here’s the script I put together to make things easier.
#!/bin/bash

# This will record a vim session with no .vimrc and create vim.gif.
# The scripts are designed to run on default sized term window.
# The cropping is sized for iTerm, so you may need to tweak it.
#
# Dependencies
# brew (or apt-get) install ttyrec imagemagick
# ttygif - https://github.com/sugyan/ttygif/releases

# Record the vim session with no .vimrc
ttyrec -e "vim -u NONE"

# Convert session to gif
ttygif

# Crop gif and get rid of the ugly header
convert tty.gif -coalesce -repage 0x0 -crop 570x354+0+22 +repage vim.gif

# cleanup
rm tty.gif
rm ttyrecord